
Well I had a challenge. I want to monitor the disk usage and the memory usage of my TurnKeyLinux appliances.
So I turn to turnkey to see if an appliance was available for monitoring, and I found it.

So I downloaded it and installed it into a virtual machine on my Hyper-V.
As expected, a smooth installation of the appliance.
Next step to configure the appliance, so my other turnkey appliances are monitored, well here came the challenge.
By default the TKL (TurnKeyLinux) appliances do not have SNMP installed, and Observium is a monitoring tool that monitors systems using SNMP.
I finally managed to get SNMP installed and configured. In the next chapter I will explain how I did it…..
Installing SNMP on TurnkeyLinux Appliances.
Start an SSH towards the system you want SNMP installed on.
Login as root or as a user with root permissions
Update the packages
apt-get update
Install SNMP
apt-get install snmpd
The installation of SNMP is now completed, Yes it’s that simple, but we are not there yet.
We still need to configure the SNMP agent so that Observium is able to pull the SNMP traps from the system.
Configuring SNMP on TurnKeyLinux Appliances.
First I backed up the current configuration, I would like to create a baseline before I change anything on systems.
If I screw up I can easily restore the original configuration.
To ensure the original configuration is saved type the following commands :
cp /etc/snmp/snmp.conf /etc/snmp/snmp.conf.bak
cp /etc/snmp/snmpd.conf /etc/snmp/snmpd.conf.bak
Now we configure the snmpd.conf, this the only one you need to configure.
Edit the snmpd.conf by typing the following command :
nano /etc/snmp/snmpd.conf
Find the line
agentAddress udp:127.0.0.1:161
Place a # at the front of the line
Find the line
#agentAddress udp:161,udp6:[::1]:161
And remove the # at the front of the line
Your configuration should now look like this.
###############################################################################
#
# AGENT BEHAVIOUR
#
# Listen for connections from the local system only
#agentAddress udp:127.0.0.1:161
# Listen for connections on all interfaces (both IPv4 *and* IPv6)
agentAddress udp:161,udp6:[::1]:161
Now the SNMP agent listens to other devices, of course you can adjust the line so the agent only listens to your Monitoring system.
Then adjust the line to:
agentAddress udp:<IP of monitoring system>:161,udp6:[::1]:161
If you are not using IPv6 than you also can remove the udp6:[::1]:161 from the line.
If this good for you turn to saving and enabling the new SNMP config, to finalize. Otherwise follow the next to configure SNMPv3.
Configuring SNMPv3 on TurnKeyLinux Appliances.
In the same file find the following line :
# createUser authOnlyUser MD5 “remember to change this password”
Remove the # at the front of the line
Think of a password you want to use for the connection from observium using SNMPv3, because SNMPv3 required a username and password.
Place the password behind the MD5 end removing the text “Remember to change this password”
You configuration should now look like :
###############################################################################
#
# SNMPv3 AUTHENTICATION
#
# Note that these particular settings don’t actually belong here.
# They should be copied to the file /var/lib/snmp/snmpd.conf
# and the passwords changed, before being uncommented in that file *only*.
# Then restart the agent
createUser authOnlyUser MD5 <Password>
# createUser authPrivUser SHA “remember to change this one too” DES <password>
# createUser internalUser MD5 “this is only ever used internally, but still change the password”
# If you also change the usernames (which might be sensible),
# then remember to update the other occurances in this example config file to match.
Let me explain the createUser..
| Username | Authentication Type | Privilege | Extra Authentication |
| authOnlyUser | MD5 | Full READONLY | n/a |
| authPrivUser | SHA | Full READWRITE | DES |
| internalUser | MD5 | Full READWRITE | n/a |
The authOnlyUser is fine for now.
Saving and enabling the new SNMP config
In the editor press and type
CTRL – X
Y
<enter>
To save the SNMPD.conf file
Enabling the SNMPD settings.
At the root command prompt type the following command :
/etc/init.d/snmpd restart
SNMP will now be restarted and the new config is applied.
This finalizes the configuration
Now turn to you Observium appliance and add the device to the monitoring system
Remember to use the SNMP v3 username and password you previously configured to connect to the system.
Username : authOnlyUser
Password : <password>
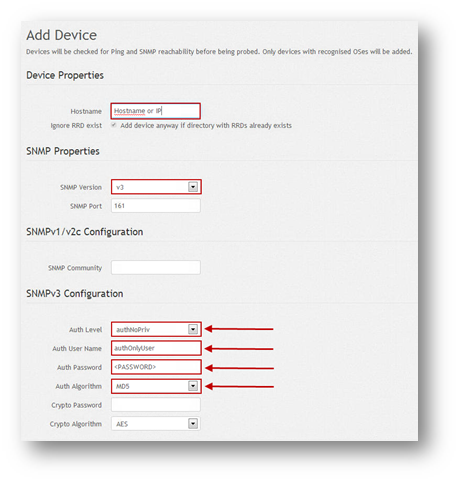 Here the screenshot from Observium on how to add the device.


More Stories
Update to latest version of TurnkeyLinux 14.0
Turnkey-Linux Backup and Migration (TKLBAM)